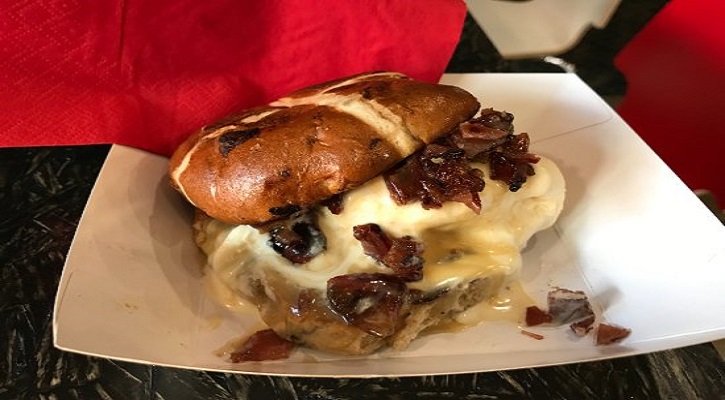
Caramel Buns Ice Cream Burger
- Womenscorner Desk
- September 28, 2020
Ingredients :
For The Ice Cream Burger Patties :
- 1 (500ml/1 pint) tub good quality vanilla ice cream, preferably in a round container (I used Haagen Dazs)
For The Chocolate Magic Shell :
- 2 cups (340g) chocolate chips, I used Hershey's semisweet
- 6 tablespoons (85g) coconut oil
- 1/4 cup (28g) (or more for chunkier texture) coarsely chopped toasted nuts, I used almonds but peanuts & hazelnuts would be perfect here
Read More : Kiwi
For The Thick Caramel Sauce For Glazing :
- 1 cup (200g) sugar
- 1/4 cup water
- 1 teaspoon white vinegar
- 1/4 teaspoon salt
- 1/2 cup (113 grams) unsalted butter, softened to room temperature
- 1/4 cup heavy whipping cream, warmed
For The Thin Caramel Sauce For Filling :
- 1/4 cup of the prepared 'Thick' caramel sauce
- 1 tablespoon heavy whipping cream, warmed
For The Vanilla Bean Cake Buns : You'll need a hemisphere mold with 4 cavities, each cavity is about 3"/7cm in diameter, 1 1/2"/4cm in depth
- 1 teaspoon vanilla extract
Read More : Eat fruit on an empty stomach
- 1 vanilla bean
- 1 1/2 cups (180g) all purpose flour
- 2 teaspoons baking powder
- 1/4 teaspoon salt
- 1/2 cup plus 6 tablespoons unsalted butter (7 oz/ 198g), softened to room temperature
- 3/4 cup (150g) granulated sugar
- 1/4 cup (50g) light brown sugar, packed
- 2 large eggs, at room temperature
- 1 large egg yolk, room temperature
- 1/2 cup buttermilk, at room temperature
For Assemling :
- 4 waffle or thin sugar cookies, for assembling as the cheese
- Toasted sesame seeds, for sprinkling
Method :
To Make The Ice Cream Burger Patties : ( can be prepared several days in advance )
If using ice cream in a round container, make sure it is very well frozen before proceeding and NOT soft at all. Line a baking sheet with parchment paper and keep well chilled in the freezer until needed. Working in a cool place, take the ice cream out of the freezer and cut into 4 equal disks, each about 1-inch/2cm thick. To do so, you'll need to keep the ice cream in its container, and using a serrated knife, carefully slice through the container and into the ice cream using a gentle sawing motion.
Read More : Health Benefits of Fruits
If the disks are still well frozen, then quickly peel the container pieces from around them and place on the chilled baking sheet. (If at any point, the ice cream is softening up, return to the freezer to firm up as needed). Using a 3-inch/7cm circle cookie cutter, cut out the extra ice cream from the wider disks so they're all the same size. Save the scrapes in a container and refreeze for another use or make 2 more patties by pressing the scraps into the cookie cutter to form a circular shape. Loosely cover the ice cream disks with plastic wrap and freeze until very firm, at least 2 hours, preferably overnight, or up to several days. If using ice cream from a rectangular container, let it soft up to a scoopable consistency.
Scoop up all the ice cream an 8 or 9 inch baking pan that has been lined with plastic wrap. Cover the top with more plastic wrap and return to the freezer until very firm. Using the plastic wrap as a handle, lift the ice cream from the pan and set onto a counter. Peel off the plastic wrap and using a 3-inch/7cm circle cookie cutter, cut out at least 4 disks of ice cream. Save the scrapes in a container and refreeze for another use or cut out more patties, if desired. Transfer the disks to a parchment lined baking sheet, cover loosely with plastic wrap and freeze until firm enough to use, at least 2 hours, preferably overnight, or up to several days.
Read More : Afternoon is the best time to eat fruit
To Make The Chocolate Magic Shell : ( can be prepared up to a week in advance )
In a medium, microwave-safe bowl, combine the chocolate chips and coconut oil. Heat in the microwave for about 1 1/2 minutes, stopping the microwave every 30 seconds and giving it a stir until the chocolate is almost melted. Keep stirring until the residual heat melts the reaming chocolate. Stir well until well combined and smooth. Allow to cool completely before using. Either store in an airtight container at room temperature, if using after several days (DO NOT REFRIGERATE), or transfer to bowl deep enough for dipping the ice cream disks in if using immediately.
Covering The Ice Cream Patties : When the ice cream is firm enough to use and the chocolate magic shell is cool, it's time to start dipping. Make sure you work in a cool place. Stir the chopped nuts into the chocolate magic shell. Line another baking sheet with parchment paper and keep nearby. Keeping the baking sheet with the firmly frozen ice cream disks in the freezer, take one disk at a time to work with. Using a wooden skewer, pierce on of the ice cream disks from the top, making sure the ice cream hangs well on it. Using the skewer as a handle, lift the ice cream disk and dip into the magic shell. Use a spoon to help pour on the magic shell into places that are hard to cover through dipping.
Lift the ice cream patty, and gently shake of any excess magic shell back in the bowl. The magic shell will harden almost immediately around of the ice cream. Place the covered patty on to the clean baking sheet and gently pull out the skewer. Using a spoon, place a tiny drop of magic shell on the pierced area to cover the hole the skewer had made. Transfer the baking sheet to the freezer. Continue dipping and covering the remaining ice cream disks, one at at time.
Read More : Vitamins and Minerals of Strawberries
To Make The Thick Carmel Suce For Glazing : In a medium saucepan, combine the sugar, water, vinegar and salt and cook over medium high heat, without stirring, only swirling the pan if needed. Brush down the sides of the pan with water to lessen the chance for crystallization. The mixture will melt and become translucent in about 3 minutes. Continue cooking about 6 minutes until the mixture turns honey colored. Watch the caramel carefully from hereon as it will caramelize in no time. It will then quickly change into an amber, caramel color. As soon as this happens, take it off the heat and add in the butter, (which will bubble vigorously) and whisk until melted and well combined. Return it to the heat if its not melting well.
Add in the cream, return to heat and continue whisking until fully incorporated. Measure out a 1/4 cup of the caramel sauce and set aside to use in making the 'Thin' caramel sauce. Allow the remaining thick caramel sauce to cool down until slightly warm before using.
To Make The Thin Caranel Sauce : Combine the reserved 1/4 cup of 'Thick' caramel sauce with the warm 1 tablespoon of heavy cream until thinned out and smooth.Allow to cool until slightly warm before using.
To Make The Vanilla Bean Cake Buns : ( Can Be Baked a Day In Advance )
Position rack in the lower center of the oven and preheat to 325F/163C. Spray 4 cavities of the hemisphere mold* (or bowls, if using) with nonstick cooking spray, or butter it thoroughly, dust it with flour, and knock out the excess. Line an 8-inch square pan with parchment paper and spray with a nonstick cooking spray, or butter it thoroughly, dust it with flour, and knock out the excess. Pour the vanilla extract in a small bowl. Cut the vanilla bean in half lengthwise and using the tip of a knife, scrape down the seeds into the vanilla; stir to blend well. Set aside. (Discard the scraped vanilla bean pod or reserve for another use; like putting it in your sugar canister to make vanilla sugar) In a medium bowl, whisk the flour, baking powder, and salt.
Read More : Nutrition Facts of Strawberries
Set aside. In the bowl of a stand mixer fitted with a paddle attachment (or using a handheld electric mixer), beat the butter until creamy, about 1 minute. Add both sugar and beat together until lightened in both color and texture, about 5 minutes. Add in the eggs and egg yolk, one at a time, until well blended after each addition. Scrape down the sides and bottom of the bowl, then beat again for 15 seconds. Add the vanilla mixture and beat until well blended, about 20 seconds. Turn the mixer on lowest speed, then add in half of the flour mixture, blend lightly, then stream in the buttermilk, followed by the rest of the flour mixture. Beat just until combined; do not overmix. Batter will be very thick and might look slightly separated and that's perfectly fine.
Divide the batter into two. Transfer the first half amount of batter into the prepared mold and then second half into the prepared square pan. Smooth out the top. Bake for 20 to 25 minutes or until a toothpick inserted in the center comes out clean or with a few cooked crumbs attached. Transfer the cakes to a wire rack and let cool in the pan on a wire rack for 15 minutes. Carefully invert the cakes on the wire rack to cool completely before proceeding. Store in an airtight container if not using right away.
Filling And Glazing The Cake Buns : ( Preferably Made The Day Of)
Using a 3-inch/7cm circle cookie cutter, cut out 4 disks of cake from the square cake. Store the scraps in an airtight container or zipper lock bag for snacking or another use.Transfer the 4 cake disks on the wire rack beside the cake hemispheres. Place a baking sheet under the wire rack to catch any drips of caramel. To prepare the hemispheres for filling, with the dome side up, using a paring knife, insert the tip at a 45-degree angle and start cutting in a circular motion until you've cut a full circle. Cut out and remove the cake cone. Hallow out a bit more cake from the center, being careful not to pierce the bottom. Cut off all but the top 1/4 inch of the cone, leaving a circular disc of cake. Discard better yet, eat! the bottom of the cone.
Fill each cake hemisphere with about a tablespoon of the 'Thin' caramel sauce and then top with the reserved cake "plug." Pour the cooled, but slightly warm 'Thick' caramel glaze over each cake hemisphere, concealing the cut-out top. Repeat the same step with the cut-ot cake disks. Collect whatever caramel glaze that has dripped on the baking sheet and use that to pour another coating of glaze over the cakes. Allow the glaze to set, before assembling.
Assembling The Dessert Burgers : On a rimmed serving plate, place the caramel covered flat cake (bottom bun), then top with the chocolate covered ice cream burger patty, then follow with a waffle cookie, then end with the caramel filled and covered cake hemisphere (top bun). Sprinkle each top bun with a few sesame seeds. Allow the assembled burger to sit a few minutes at room temperature to give the ice cream a chance to soften up. This will not only make it easier to break into, but will give that dramatic oozing and pooling ice cream effect.
Dig in and enjoy!
Read More : Health and Nutrition Benefits of Pears

